Installation
This guide shows how to install the CH32V development environment. Note that this also overlaps with official documentation such as Getting started with VSCode + PlatformIO.
Install VSCode
Download and install VSCode from https://code.visualstudio.com/.
Install PlatformIO
Open the “Extensions” sidebar, search for “PlatformIO” and hit “install”.

Install CH32V Platform
Expand the PlatformIO sidebar (ant icon) and click “PIO Home”.

In the resulting PIO Home window, click on the “Platforms” sidebar and chose “Advanced Installation”

You will be asked for a repistory. Enter the URL and press “Install”.
https://github.com/Community-PIO-CH32V/platform-ch32v.git

The platform should now be successfully installed.
Experienced PlatformIO CLI users can also use the short-hand command
pio pkg install -g -p https://github.com/Community-PIO-CH32V/platform-ch32v.git
Install Drivers / Rules
Windows Driver Installation
Flashing development boards via a WCH-Link(E) probe (and SWCLK and/or SWDIO connection) requires that W.CH’s USB drivers for that are installed.
Download the WCHLink Driver Windows package
Unpack it
Run
WCHLink\SETUP.EXEand follow installation instructionsRun
WCHLinkSER\SETUP.EXEand follow installation instructions
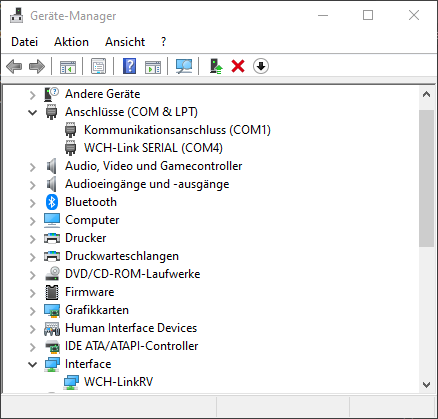
If successful, once you plug in the WCH-Link(E) device, you should have a “serial port” and “interface”-type device in the Windows device manager.
Flashing development boards via their built-in USB bootloader requires that WinUSB drivers are loaded for that device.
Download Zadig
Start Zadig and activate Options → List All Devices
Put your development board into bootloader mode
for most: BOOT0 to 3.3V, BOOT1 to GND
or hold marked “BOOT” button
Plug development board into computer
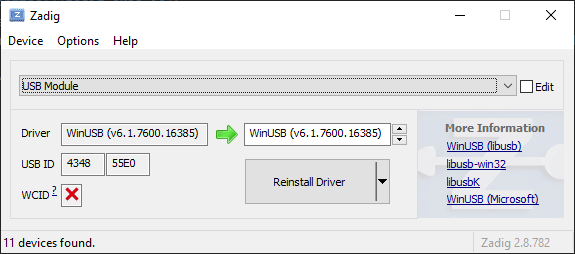
Select the “USB Module” device in Zadig
Select “WinUSB” on the right side
Click “Replace driver”
It should now look like this:
Note
Some devices like the CH5xx chips seem to have a timeout on the USB bootloader, which complicates things. When you hear the USB eject sound, quickly replug the device while holding down the BOOT button of it, then driver installation should go through.
Linux udev Rules
In Linux, for regular non-sudo users to be able to access certain USB devices, like the WCH-Link(E) debugging probe or the USB bootloader device, you need to set up udev rules.
First all, make sure PlatformIO’s udev rules are installed per Documentation.
Then, assuming a Debian-like system with a “plugdev” group, append the following content to /etc/udev/rules.d/99-platformio-udev.rules:
SUBSYSTEM=="usb", ATTR{idVendor}="1a86", ATTR{idProduct}=="8010", GROUP="plugdev"
SUBSYSTEM=="usb", ATTR{idVendor}="4348", ATTR{idProduct}=="55e0", GROUP="plugdev"
SUBSYSTEM=="usb", ATTR{idVendor}="1a86", ATTR{idProduct}=="8012", GROUP="plugdev"
Restart your system after applying these changes.
Note
If you are running a different type system, replace the GROUP value as needed, e.g., with uucp.